The MTCNN is a class of Multi-task Cascaded Convolutional Network models. They are very good at detection faces and facial features. You can train (or retrain) MTCNN models with your own faces dataset so that it can accurately detect faces for your application.
Second State FaaS provides a Rust API to run Tensorflow-based MTCNN models at native speeds. In this article, we will use the original MTCNN model trained in the FaceNet dataset as an example. We will create a FaaS application that uses this popular model to detect faces in an input image, and returns an image with all faces outlined in boxes.
The source code for the face detection example in this article is available on Github.
Prerequisites
Follow these simple instructions to install Rust and rustwasmc.
The inference function
The infer() function is written in Rust and compiled to WebAssembly. It does the heavy lifting of data preparation and model preparation. Both tasks are highly dependent on the function’s actual use case scenario. It then calls the Tensorflow WASI API to execute the tensorflow model, analyzes the model’s return values, and then creates a new image with box outlays from the model return values.
Below is an annotated and abridged version of the function source code. The comments explain the 6 steps the function performs.
#[wasm_bindgen]
pub fn infer(image_data: &[u8]) -> Vec<u8> {
    // 1. Load the input image
    let mut img = image::load_from_memory(image_data).unwrap();

    // 2. Convert the image into a vector f32 values representing the RGB values for each pixel
    let mut flat_img: Vec<f32> = Vec::new();
    for (_x, _y, rgb) in img.pixels() {
        flat_img.push(rgb[2] as f32);
        flat_img.push(rgb[1] as f32);
        flat_img.push(rgb[0] as f32);
    }

    // 3. Load the frozen saved tensorflow model into a byte array. The model is trained to detect faces in the input image.
    let model_data: &[u8] = include_bytes!("mtcnn.pb");

    // 4. Execute the model with the image as input, and retrieves the model output
    // 4.1 The model type of a Tensorflow frozen model. SSVM could also handle Tensorflow Lite (TFLite) models.
    let mut session = ssvm_tensorflow_interface::Session::new(model_data, ssvm_tensorflow_interface::ModelType::TensorFlow);
    // 4.2 Multiple input tensors for image data and parameters. Each input tensor has a name, data, and shape.
    // 4.3 Multiple output tensors for the results. Each output tensor has a name.
    session.add_input("min_size", &[20.0f32], &[])
           .add_input("thresholds", &[0.6f32, 0.7f32, 0.7f32], &[3])
           .add_input("factor", &[0.709f32], &[])
           .add_input("input", &flat_img, &[img.height().into(), img.width().into(), 3])
           .add_output("box")
           .add_output("prob")
           .run();
    // 4.4 Retrieve the data vector associated with the named output tensor.
    let res_vec: Vec<f32> = session.get_output("box");

    // 5. Create arrays of boxes for detected faces
    let mut box_vec: Vec<[f32; 4]> = Vec::new();
    // ... ...

    // 6. Create and return a new image with the boxes overlay on the detected faces
    let mut buf = Vec::new();
    img.write_to(&mut buf, image::ImageOutputFormat::Png).expect("Unable to write");
    return buf;
}
Steps 1-3 prepares the model and image data. Step 4 calls the Tensorflow WASI functions to execute the model and retrieves the probability array for classifications of the main object on image. In steps 5 and 6, the infer() function processes the returned probability array, and draws boxes around the detected faces.
FaaS deployment
First, build the function via the rustwasmc tool.
$ rustwasmc build
Upload the WebAssembly file to the FaaS and get a wasm_id to call later.
$ curl --location --request POST 'https://rpc.ssvm.secondstate.io:8081/api/executables' \
--header 'Content-Type: application/octet-stream' \
--header 'SSVM-Description: MTCNN' \
--data-binary '@pkg/mtcnn_service_lib_bg.wasm'
{"wasm_id":147,"wasm_sha256":"0x469c28daae7aba392076b4bc5ee3b43ec6d667083d8ae63207bf74b1da03fc26","SSVM_Usage_Key":"00000000-0000-0000-0000-000000000000","SSVM_Admin_Key":"7dxxxxxx-xxxx-xxxx-xxxx-xxxxxxxx0c41"}
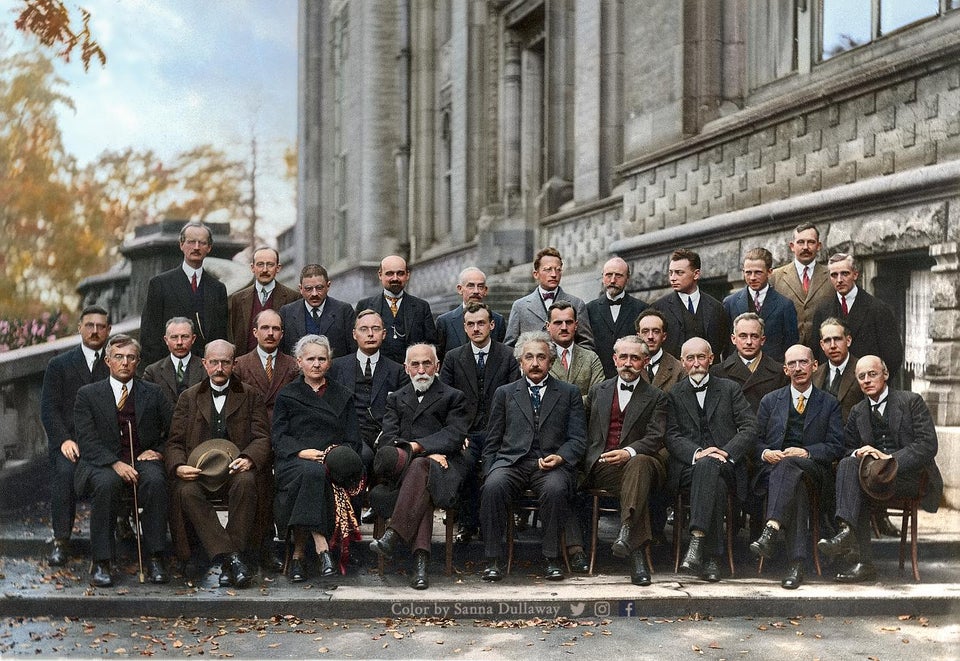
Now you can call the function to detect faces in an image. Here is an example image the attendees of the 1927 Solvay Conference. Of the 29 scientists in this photo, 17 of them received Nobel Prizes in their careers.
We pass the image to the FaaS function via an HTTP request, and it returns the classification label and confidence in the HTTP response.
$ curl --location --request POST 'https://rpc.ssvm.secondstate.io:8081/api/run/147/infer' \
--header 'Content-Type: application/octet-stream' \
--data-binary '@test/solvay.jpg' \
--output tmp.png
The result image with green face boxes are shown below.

Web UI
On a static web page, you can use JavaScript to make an AJAX call to this FaaS function. The AJAX function posts an uploaded image file. The AJAX response is binary data for a new image with detected faces (bytes). The JavaScript displays the response image on the page.
  $.ajax({
      url: "https://rpc.ssvm.secondstate.io:8081/api/run/147/infer/bytes",
      type: "post",
      data : $('#input')[0].files[0],
      contentType: "application/octet-stream",
      processData: false,
      xhrFields:{
        responseType: 'blob'
      },
      success: function (data) {
        const img_url = URL.createObjectURL(data);
        $('#wm_img').prop('src', img_url);
      }
  });
WasmEdge and Node.js deployment
A key strength of the Second State FaaS is that it is completely compatible with Node.js. That means the Rust function we compiled and deployed on the FaaS can also run on a Node.js server without any change. The source code repository provides a script for you to test the function locally on Node.js. To deploy this example on Node.js, you will need to first install the WasmEdge addon for Node.js. Make sure that you install the wasmedge-extensions NPM package, as well as its dependency Tensorflow library on your system.
You can build the WebAssembly bytecode program from the Rust function as follows.
$ rustwasmc build --enable-aot --enable-ext
The test/test.js script illustrates how to instantiate a SSVM VM and run the WebAssembly bytecode program.
$ cd test
$ node test.js
... creates the res.jpg file ...
That's it! Review the test/test.js script to see how you can incorporate the WebAssembly program into your own Node.js applications.
What’s next
Now it is your turn to create functions that use your own MTCNN models or to use a different output tensor of the standard model (e.g., to get facial features instead of just the boxes).