MobileNet is a class of Convolutional Neural Networks (CNN) models for computer vision applications. The most common application for MobileNet models is image classification. You can train (or retrain) a MobileNet model to recognize objects that are interesting to your application (e.g., to classify birds in a bird watching application).
Second State FaaS provides a Rust API to run Tensorflow-based MobileNet models at native speeds. In this article, we will use a MobileNet model trained from the ImageNet dataset as an example. We will create a FaaS application that uses this popular model to classify common objects in an input image.
The source code for the image classification example in this article is available on Github.
Prerequisites
Follow these simple instructions to install Rust and rustwasmc.
The inference function
The infer() function is written in Rust and compiled to WebAssembly. It does the heavy lifting of data preparation and model preparation. Both tasks are highly dependent on the function’s actual use case scenario. It then calls a Tensorflow WASI API to execute the tensorflow model, and analyzes and prepares the model’s return values for the function caller.
Below is an annotated and abridged version of the function source code. The comments explain the 7 steps the function performs. In steps #3 and #4, we loaded a generic MobileNet model trained on the ImageNet dataset. You can load your own retrained (or fine-tuned) MobileNet model file and its corresponding classification labels file.
#[wasm_bindgen]
pub fn infer(image_data: &[u8]) -> String {
    // 1. Load the input image and resize it to 224x224, which is the dimension required by this particular MobileNet model.
    let img = image::load_from_memory(image_data).unwrap().to_rgb();
    let resized = image::imageops::thumbnail(&img, 224, 224);

    // 2. Convert the image into a vector f32 values representing the RGB values for each pixel
    let mut flat_img: Vec<f32> = Vec::new();
    for rgb in resized.pixels() {
        flat_img.push(rgb[0] as f32 / 255.);
        flat_img.push(rgb[1] as f32 / 255.);
        flat_img.push(rgb[2] as f32 / 255.);
    }

    // 3. Load the frozen saved tensorflow model into a byte array. The model is trained to recognize objects in the input image.
    let model_data: &[u8] = include_bytes!("mobilenet_v2_1.4_224_frozen.pb");
    // 4. Load the classification labels file that corresponds to the model.
    //    The model output is a series of numbers. The labels file maps those numbers (i.e., line numbers) to actual text description of the object classification.
    let labels = include_str!("imagenet_slim_labels.txt");

    // 5. Execute the model with the image as input tensor, and retrieves the model output tensor
    // 5.1 Initialize the session with the model, and specify the model type as a Tensorflow frozen model. It could also take a TFLite model.
    let mut session = ssvm_tensorflow_interface::Session::new(model_data, ssvm_tensorflow_interface::ModelType::TensorFlow);
    // 5.2 Specify the model's input tensor name, data, and shape, as well as the output tensor name. There could be multiple input and output tensors. Execute the model.
    session.add_input("input", &flat_img, &[1, 224, 224, 3])
           .add_output("MobilenetV2/Predictions/Softmax")
           .run();
    // 5.3 Retrieve the data vector associated with the named output tensor.
    let res_vec: Vec<f32> = session.get_output("MobilenetV2/Predictions/Softmax");

    // 6. Each of number in the res_vec vector corresponds to the probability of the image containing an object defined in the labels file.
    // 6.1 Find the highest probability ...
    // 6.2 Translate probability into text ...
    // 6.3 Look up the corresponding label text ...

    // 7. The text label and probability is returned to the FaaS caller.
    let ret: (String, String) = (label_lines.next().unwrap().to_string(), confidence.to_string());
    return serde_json::to_string(&ret).unwrap();
}
Steps 1-4 prepares the model and image data. Step 5 calls the Tensorflow WASI functions to execute the model and retrieves the probability array for classifications of the main object on image. In steps 6 and 7, the infer() function processes the returned probability array, and converts the results to text labels and probability levels.
FaaS deployment
First, build the function via the rustwasmc tool.
$ rustwasmc build
Upload the WebAssembly file to the FaaS and get a wasm_id to call later.
$ curl --location --request POST 'https://rpc.ssvm.secondstate.io:8081/api/executables' \
--header 'Content-Type: application/octet-stream' \
--header 'SSVM-Description: mobilenet' \
--data-binary '@pkg/mobilenet_service_lib_bg.wasm'
{"wasm_id":146,"wasm_sha256":"0x469c28daae7aba392076b4bc5ee3b43ec6d667083d8ae63207bf74b1da03fc26","SSVM_Usage_Key":"00000000-0000-0000-0000-000000000000","SSVM_Admin_Key":"7dxxxxxx-xxxx-xxxx-xxxx-xxxxxxxx0c41"}
Now you can call the function to classify an image. Here is an example image showing computer science pioneer Dr. Grace Hopper.
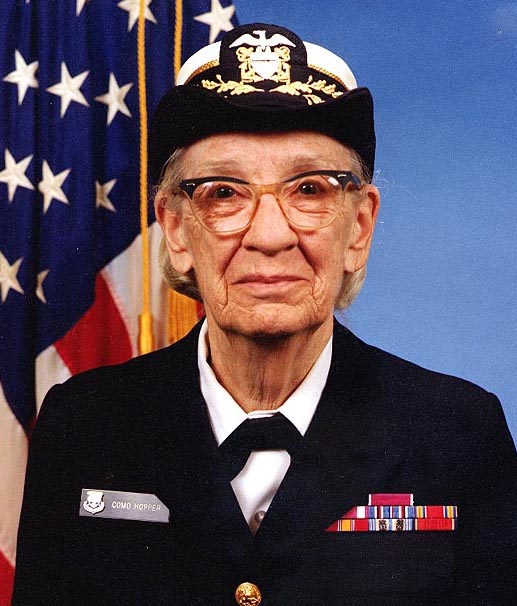
We pass the image to the FaaS function via an HTTP request, and it returns the classification label and confidence in the HTTP response.
$ curl --location --request POST 'https://rpc.ssvm.secondstate.io:8081/api/run/146/infer' \
--header 'Content-Type: application/octet-stream' \
--data-binary '@test/grace_hopper.jpg'
["military uniform","medium"]
Web UI
On a static web page, you can use JavaScript to make an AJAX call to this FaaS function. The AJAX function posts an uploaded image file. The AJAX response is the classification label and confidence the MobileNet tensorflow inferred from the image.
  $.ajax({
      url: "https://rpc.ssvm.secondstate.io:8081/api/run/146/infer",
      type: "post",
      data : $('#input')[0].files[0],
      contentType: "application/octet-stream",
      processData: false,
      success: function (data) {
        $('#result').html(data);
      }
  });
WasmEdge and Node.js deployment
A key strength of the Second State FaaS is that it is completely compatible with Node.js. That means the Rust function we compiled and deployed on the FaaS can also run on a Node.js server without any change. The source code repository provides a script for you to test the function locally on Node.js. To deploy this example on Node.js, you will need to first install the WasmEdge addon for Node.js. Make sure that you install the wasmedge-extensions NPM package, as well as its dependent Tensorflow library on your system.
You can build the WebAssembly bytecode program from the Rust function as follows.
$ rustwasmc build --enable-aot --enable-ext
The test/test.js script illustrates how to instantiate a WasmEdge VM and run the WebAssembly bytecode program.
$ cd test
$ node test.js
["military uniform","medium"]
That's it! Review the test/test.js script to see how you can incorporate the WebAssembly program into your own Node.js applications.
What’s next
Now it is your turn to create functions that use your own MobileNet models to provide AI vision services on the web.