By apepkuss
On July 28, WasmEdge 0.10.1 was officially released. This piece is an introduction to the implementation of WebAssembly WASI-NN Proposal in WasmEdge 0.10.1, the first in a series of wasi-nn articles. Our next article will be on the optimization made on WasmEdge for the wasi-nn proposal.
Nowadays AI inference is trendy. From a technical perspective, the regular workflow of AI inference task is loading model, performing inference, and presenting result. This looks like a perfect serverless function, since AI inference has simple inputs and outputs, and no status. As we all know, AI inference is a computationally intensive task. Using WebAssembly and Rust you can implement high-performance AI inference functions, and ensure function safety and cross-platform ease of use with Wasm.

In the latest release, WasmEdge Runtime[1] has implemented WASI-NN[2] proposal, and the backend inference engine supported currently is Intel OpenVINO[3]. A good news is that PyTorch backend will also be supported in the next release; besides, TensorRT and ONNX inference engines are also on our list.
N.B. that
WasmEdge Runtimedesigned two different solutions to integrate different machine learning inference engines: one is non-wasi-nn interfaces forTensorFlow, the other is wasi-nn interfaces for OpenVINO. In near future,WasmEdge Runtimewill support all currently supported AI inference engines with wasi-nn interfaces.
So, how to use this new set of interface specifications to build AI inference tasks based on WebAssembly technology? What does the development process look like? How complex is it? In the rest of this article, we try to answer these questions by demonstrating a simple road segmentation ADAS example. The sample code and relevant artifacts used below can be found and downloaded at this WasmEdge-WASINN-examples repo.
What is WASI-NN?
Before demonstration, let's talk a little bit about WASI-NN[4] proposal.
In fact, WASI-NN proposal consists of two parts:WASI is the abbreviation for WebAssembly System Interface. Simply put WASI defined a set of interface specifications to allow WebAssembly to run securely in a non-browser environment with finer-grained permission control; NN stands for Neural Network. Obviously, WASI-NN is an integral part of the WASI interface specification, which is mainly for the machine learning use case.
In theory, this interface specification can be used for both model training and model inference. Our example is only for model inference. More details on the WASI and WASI-NN interface specifications can be found at wasi.dev.
Currently, stable WASI-NN support is available on the master branch of the WasmEdge Runtime project, covering the five main interfaces defined by the WASI-NN Proposal Phase 2:
// Load byte sequence of the model
load: function(builder: graph-builder-array, encoding: graph-encoding, target: execution-target) -> expected<graph, error>

// Create a computational graph execution instance
init-execution-context: function(graph: graph) -> expected<graph-execution-context, error>

// Load input
set-input: function(ctx: graph-execution-context, index: u32, tensor: tensor) -> expected<unit, error>

// Perform inference
compute: function(ctx: graph-execution-context) -> expected<unit, error>

// Get output
get-output: function(ctx: graph-execution-context, index: u32) -> expected<tensor, error>
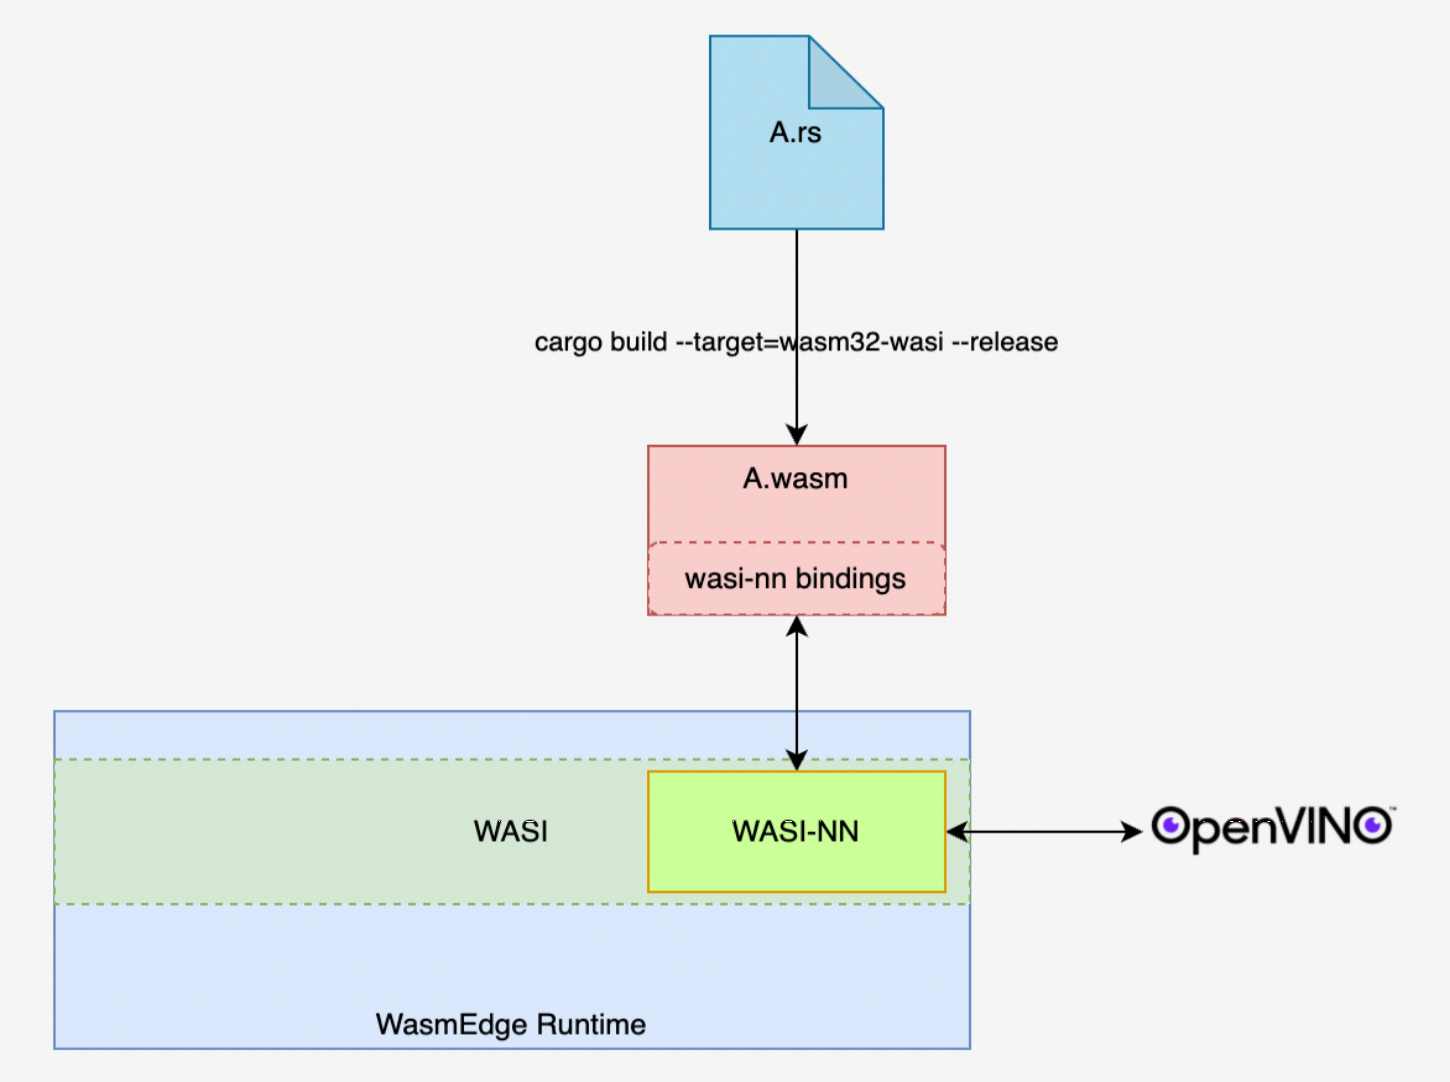
These interfaces mainly serve as a pipeline for “intercommunication” between Wasm modules and local system resources. In inference tasks, the data transmission between the front end (Wasm module) and the back end (inference engine) is done through this pipeline. The following figure is a simplified application diagram of the WASI-NN interface of WasmEdge Runtime. In the figure, the WASI-NN interface represented by the green rectangle “binds” the front-end Wasm module with the back-end OpenVINO inference engine. The following example, in its execution inference, achieves a series of tasks such as data interaction and function scheduling between the front and back ends through the built-in WASI-NN interface of WasmEdge Runtime.
Below, combined with specific examples, let's see how to build a “simple but not simplistic” machine learning inference task based on WasmEdge Runtime.
Road Segementation ADAS with OpenVINO
Before we get started, let's define the process of building machine learning inference tasks using the WASI-NN interface, so as to have a general grasp of the tasks to complete.
- Task 1: Define the inference task and prepare the inference model and input
- Task 2: Set up environment
- Task 3: Build the wasm inference module
- Task 4: Execute the wasm module. Through the command line execution mode provided by
WasmEdge Runtime, namelystandalonemode, execute the wasm module created in task 3 to complete the inference task. - Task 5: Visualize the resulting data for the inference task.
Below we describe in detail how to accomplish the above tasks.
Task 1: Preparation of the inference model and input image
In choosing the inference model, for the sake of convenience, we selected road-segmentation-adas-0001 model in Intel's official openvino-model-zoo[5] open source repo. This model is mainly used to complete the task of real-time road segmentation in autonomous driving scenarios. To simplify the scale of the example, we only use pictures as input for this inference task.
Task 2: Environment Setup
We choose Ubuntu 20.04 as the system environment. The WasmEdge project also provides its own Ubuntu 20.04 development environment, so to simplify the environment preparation process you can pull the system image from docker hub. In addition to the system environment, the following installation packages need to be deployed:
- Install OpenVINO 2021.4 Official installation guide
- Install WasmEdge Runtime v0.10.0 Official installation guide
- Install OpenCV 4.2 Official installation guide
- Install Jupyter Notebook Official installation guide (Optional)
- Install Rustup compile toolchain Official installation guide
It needs to be explained here that the installation of Jupyter Notebook is mainly for two reasons: On the one hand, to use Python, Numpy and OpenCV to visualize data, such as sample images and inference results; On the other hand, through Evcxr plugin for an interactive, lightweight Rust development environment that is great for developing demo code.
Once the environment is ready, you can download the code and related files for the example project. The complete code of this example project and related files for demonstration are stored in WasmEdge-WASINN-examples/openvino-road-segmentation-adas, which can be downloaded with the following command:
// Download the sample project
git clone git@github.com:second-state/WasmEdge-WASINN-examples.git

// Go to the root directory of this example
cd WasmEdge-WASINN-examples/openvino-road-segmentation-adas/rust

// View the directory structure of the sample project
tree .
Demo project's catalogue structure should be as the following:
.
├── README.md
├── image
│   └── empty_road_mapillary.jpg ---------------- (The input image for the inference task in the example)
├── image-preprocessor   ------------------------ (Rust project for converting input images to OpenVINO tensor)
│   ├── Cargo.lock
│   ├── Cargo.toml
│   └── src
│       └── main.rs
├── model --------------------------------------- (The OpenVINO model file used in the example: The xml file describes the model architecture, and the bin file stores the weight data of the model)
│   ├── road-segmentation-adas-0001.bin
│   └── road-segmentation-adas-0001.xml
├── openvino-road-segmentation-adas-0001 -------- (Rust project, which defines the wasi-nn interface call logic. Compiled into wasm modules and executed via WasmEdge CLI calls)
│   ├── Cargo.lock
│   ├── Cargo.toml
│   └── src
│       └── main.rs
├── tensor -------------------------------------- ()
│   ├── wasinn-openvino-inference-input-512x896x3xf32-bgr.tensor ---(The binary file is converted from the input image as the input into the wasm inference module)
│   └── wasinn-openvino-inference-output-1x4x512x896xf32.tensor  ---(This binary file holds the result data generated by the wasm inference module
└── visualize_inference_result.ipynb ------------ (For visualizing data)
According to the notes in the directory structure above, you have a general understanding of this example project. Here are a few to note:
-
Example image convert to OpenVINO Tensor
For developers who use
OpenVINOas the backend of theWASI-NNinterface for the first time, this is tricky.- First, Intel officially used the
*.bgrfile as the input of the inference task in the example of its openvino-rs[6] open source project. This file is actually a binary file, andbgrindicates that the file data corresponds to a picture inBGRformat. Also, a tool calledopenvino-tensor-convertercan be found in the openvino-rs project. This tool is used to generate the*.bgrfiles in the example. Theimage-preprocessorin our example project is also improved with this tool. - The second error-prone place is the dimensional arrangement of the input tensor. In Intel's official
openvino-model-zooandopenvino-notebooks[7] open source project documents,NCHWis used as the dimensional arrangement of the input tensor; and when validating with the Python API and Rust API, this dimensional arrangement is also followed. However, when usingwasi-nn crate[8], the dimension arrangement of the input tensor isHWC. The exact reason for this is not yet known.
- First, Intel officially used the
-
This two sub-project
image-preprocessorandopenvino-road-segmentation-adas-0001are both Rust project.They are not combined to one project because the former depends onopencv-rs[9] thus can not compile to wasm module. Right now a method worth trying is to exchangeopencv-rstoimage[10]. You can have a try in the exchange.
Task 3: Build the Wasm inference module
Because the focus of the example is the WASI-NN interface, less will be said about the image-preprocessor (Check out the code if interested). So let's take a look at the WASI-NN interface. WebAssembly.org provides two important documents in the WebAssembly/wasi-nn[11] official Github repo: One is wasi-nn.wit.md, another is wasi-nn.abi.md. The former uses wit syntax format to describe the interfaces and related data structures in the WASI-NN interface specification, The latter provides a clearer definition of the data types of the former. The following are the 5 interface functions given by wasi-nn.wit.md:
// Step 1:Load the model files and configurations required for this inference task
// builder: the model file to load
// encoding: The type of backend inference engine, such as openvino, tensorflow, etc.
// target: The type of hardware accelerator used, such as cpu, gpu, etc.
load: function(builder: graph-builder-array, encoding: graph-encoding, target: execution-target) -> expected<graph, error>

// Step 2:Initialize the execution environment of this inference task through the graph created in the first step.
// graph-execution-context is actually the encapsulation of a session created by the back-end reasoning engine for this reasoning task, so as to bind the graph created in the first step and the tensor provided in the third step.
// to perform the inference task in the fourth step.

init-execution-context: function(graph: graph) -> expected<graph-execution-context, error>

// Step 3: Set the input for this inference task
set-input: function(ctx: graph-execution-context, index: u32, tensor: tensor) -> expected<unit, error>

// Step 4: Execute this inference task
compute: function(ctx: graph-execution-context) -> expected<unit, error>

// Step 5: After the inference task is successfully completed, extract the inference result data.
get-output: function(ctx: graph-execution-context, index: u32) -> expected<tensor, error>
As can be seen from the comments above, these five interface functions constitute a template for completing an inference task using the WASI-NN interface. Because the two wit format files mentioned above only give a “formal” definition of the WASI-NN interface, each programming language can further instantiate these interfaces. In the Rust language community, two Intel engineers Andrew Brown and Brian Jones jointly created the WASI-NN Rust binding: wasi-nn crate. Our example will build an inference module through the interface provided by this crate.
Next, let's take a look at the openvino-road-segmentation-adas-0001 sub-project used to build the inference Wasm module in this example. The following code snippet is the most important part of this project: The inference function.
// openvino-road-segmentation-adas-0001/src/.main.rs

/// Do inference
fn infer(
    xml_bytes: impl AsRef<[u8]>,
    weights: impl AsRef<[u8]>,
    in_tensor: nn::Tensor,
) -> Result<Vec<f32>, Box<dyn std::error::Error>> {
    // Step 1: Load the model files and configurations required for this inference task
    let graph = unsafe {
        wasi_nn::load(
            &[xml_bytes.as_ref(), weights.as_ref()],
            wasi_nn::GRAPH_ENCODING_OPENVINO,
            wasi_nn::EXECUTION_TARGET_CPU,
        )
        .unwrap()
    };

  	// Step 2: Initialize the execution environment of this inference task through the graph created in the first step
    let context = unsafe { wasi_nn::init_execution_context(graph).unwrap() };

  	// Step 3: Set the input of this inference task
    unsafe {
        wasi_nn::set_input(context, 0, in_tensor).unwrap();
    }

    // Step 4: Execute this inference task
    unsafe {
        wasi_nn::compute(context).unwrap();
    }

    // Step 5: After the inference task is completed, extract the inference result data
    let mut output_buffer = vec![0f32; 1 * 4 * 512 * 896];
    let bytes_written = unsafe {
        wasi_nn::get_output(
            context,
            0,
            &mut output_buffer[..] as *mut [f32] as *mut u8,
            (output_buffer.len() * 4).try_into().unwrap(),
        )
        .unwrap()
    };

    println!("bytes_written: {:?}", bytes_written);

    Ok(output_buffer)
}
From the code logic of the infer function body, we can see:
- The call logic of the interface function replicates the
WASI-NNinterface call template described earlier. - Currently, the
wasi-nncrate still provides the unsafe interface. For theWasmEdge Runtimecommunity devs, providing a crate encapsulated securely based on the existingwasi-nncrate will be more user friendly.
Since our example is to be executed through the command line interface provided by WasmEdge Runtime, we will compile the openvino-road-segmentation-adas-0001 sub-project (where the infer function is located at) to a wasm module. Before you start compiling, make sure that the rustup toolchain has the wasm32-wasi target installed with the command below.
rustup target list
If have not seen wasm32-wasi (installed) in the returned result, it can be installed with the following command:
rustup target add wasm32-wasi
Now execute the following order and compile to get the inference Wasm module:
// Make sure the current directory is the root directory of the openvino-road-segmentation-adas-0001 sub-project

cargo build --target=wasm32-wasi --release
If the compilation succeeds, in the ./target/wasm32-wasi/release path, you can find a module named rust-road-segmentation-adas.wasm, i.e. the Wasm module that calls the WASI-NN interface.
Task4:Execute wasm module
According to the entry function of therust-road-segmentation-adas.wasm module, when calling this module via WasmEdge Runtime command line, 3 input should be provided (see the following code comments):
// openvino-road-segmentation-adas-0001/src/main.rs

fn main() -> Result<(), Box<dyn std::error::Error>> {
    let args: Vec<String> = env::args().collect();
  	// openvino model architecture file
    let model_xml_name: &str = &args[1];
  	// openvino model weights file
    let model_bin_name: &str = &args[2];
  	// openvino tensor file converted from pictures
    let tensor_name: &str = &args[3];

    ...
}
To reproduce, the files required for the example can be found in the example project:
- Road-segmentation-adas-0001 model architecture file: model/road-segmentation-adas-0001.xml
- Road-segmentation-adas-0001 model weights file: model/road-segmentation-adas-0001.bin
- Input for the inference: tensor/wasinn-openvino-inference-input-512x896x3xf32-bgr.tensor
Since we used the model from Intel's official openvino model zoo, the input and output information of the model can be found in the road-segmentation-adas-0001 model page. In addition, the image file cannot be directly used as input, but needs to undergo some preprocessing, such as resizing and RGB to BGR, etc., and then convert it into a byte sequence, so that it can be passed to the backend through the interface provided by the wasi-nn crate inference engine. The *.tensor file above is the binary file that the image file image/empty_road_mapillary.jpg is preprocessed by the image-preprocessor tool. If you want to try to use your own images during the inference, you can get the corresponding *.tensor files in two ways:
// Go to the root directory of the image-preprocessor sub-project and execute the following command

cargo run -- --image ../image/empty_road_mapillary.jpg --dims 512x896x3xfp32 --tensor wasinn-openvino-inference-input-512x896x3xf32-bgr.tensor

// Alternatively, obtain the im2tensor executable by compiling the image-preprocessor sub-project, and then perform the conversion

cargo build --release
cd ./target/release
im2tensor --image ../image/empty_road_mapillary.jpg --dims 512x896x3xfp32 --tensor  wasinn-openvino-inference-input-512x896x3xf32-bgr.tensor
After the input file is ready, we can perform inference tasks through the command line tools provided by WasmEdge Runtime.
-
First, make sure
WasmEdge Runtimecommand line tools have been deployed to the local system.wasmedge --version // Or /your/local/path/to/wasmedge-release/bin/wasmedge --versionIf you do not see
wasmedge version 0.10.0.-71-ge920d6e6or similar version info, then you can install by following the steps of WasmEdge Runtime Official Installation Guide . -
If
WasmEdge Runtimecommand line tools work, then execute the following command to execute the inference task//Execute the following command in the root directory of this example project wasmedge --dir .:. /path/to/rust-road-segmentation-adas.wasm ./model/road-segmentation-adas-0001.xml ./model/road-segmentation-adas-0001.bin ./tensor/wasinn-openvino-inference-input-512x896x3xf32-bgr.tensorAfter the inference task starts, the following information should be printed on the terminal:
Load graph XML, size in bytes: 401509
Load graph weights, size in bytes: 737192
Load input tensor, size in bytes: 5505024
Loaded graph into wasi-nn with ID: 0
Created wasi-nn execution context with ID: 0
Executed graph inference
bytes_written: 7340032
dump tensor to "wasinn-openvino-inference-output-1x4x512x896xf32.tensor" --- After the inference task in completed, the result is saved in this binary file

        The size of bytes: 7340032   --------------------------------------- Number of bytes of result data
Note: In order to increase the readability of the output file, we hard-coded the name of the export file according to certain rules, where
1x4x512x896xf32is used to identify the original dimension of the output data asNCHW, and the data type isfloat32. The purpose of this is to facilitate data conversion when post-processing or visualization of the resulting data is performed later. Next, let's do it in practice, combining Python, Numpy, and OpenCV to visualize the input image, inference result data, and final result data on Jupyter Notebook.
Task 5: Data Visualization for Inference Tasks
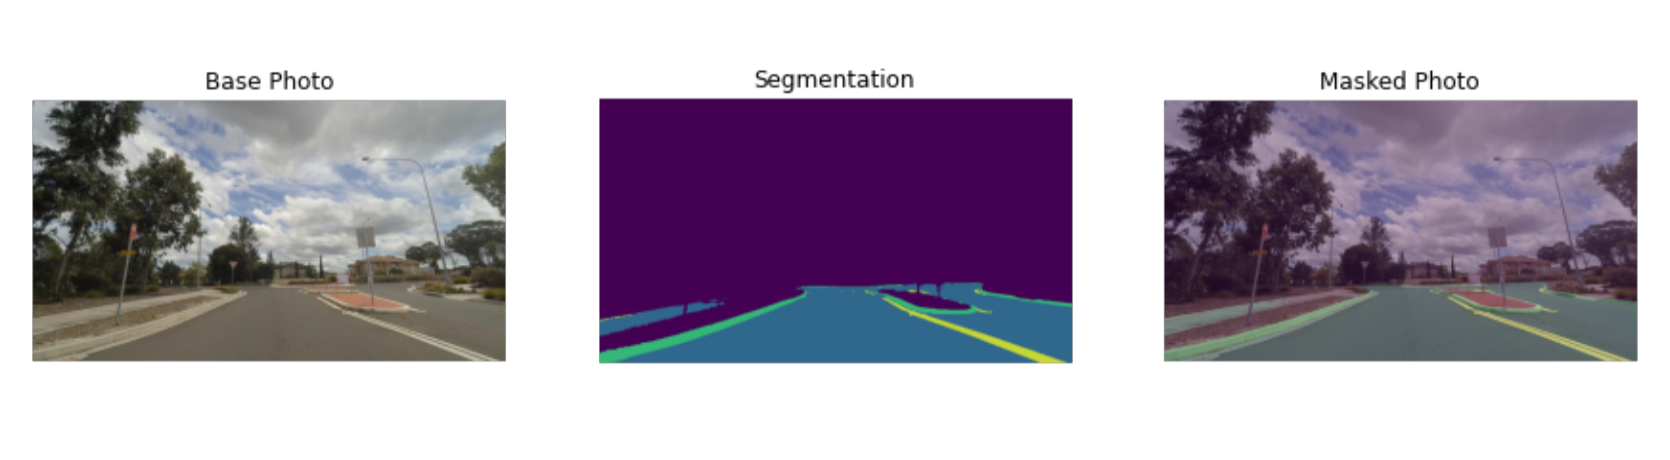
In order to observe the data before and after the inference process more intuitively, we use Jupyter Notebook to build a simple data visualization tool. The following three pictures are the visualization results of the three parts of the data: The Segmentation picture in the middle is from the inference Wasm module; The left and right pictures are the original picture and the final result picture. The code related to data visualization is defined in visualize_inference_result.ipynb . You can use it as a reference to rewrite to suit your own needs if interested. No further elaboration here. For data visualization, the functionality and convenience provided by the Python ecosystem is much better than the Rust ecosystem.
Summary
This article shows how to use the WASI-NN interface provided by WasmEdge Runtime to build a machine learning demo of road segmentation, with a simple example.
From this example, we can see that compared with traditional machine learning methods, building machine learning applications based on WebAssembly technology barely increases the size of the code, and with a small maintenance cost for the additional code. However, on the application side, these small incremental “costs” can help achieve better service performance. For example, in the context of cloud services, WebAssembly can provide a cold start speed 100 times faster than docker, an execution time 10% to 50% less, needing a tiny storage space.
The WASI-NN proposal provides a unified and standardized interface specification, which enables the WebAssembly runtime to integrate with various types of machine learning inference engine backends through a single interface, greatly reducing the complexity of system integration and subsequent maintenance and upgrades. At the same time, this interface specification also provides an abstraction that isolates the front-end and back-end details from each other, which is conducive to the rapid construction of machine learning applications. With the continuous improvement of the WASI-NN interface specification and the maturing of the ecosystem, it is believed that WebAssembly technology will change the current deployment and application methods of machine learning solutions significantly.
Find more examples here. Now it is your turn to add some awesome wasi-nn examples under cool use cases!
References
[1] WasmEdge Runtime GitHub Repo: https://github.com/WasmEdge/WasmEdge
[2] WebAssembly System Interface Proposal:https://github.com/WebAssembly/WASI
[3] Intel OpenVINO Website https://docs.openvino.ai/latest/index.html
[4] WebAssembly/wasi-nn proposal: https://github.com/WebAssembly/wasi-nn
[5] openvino-model-zoo repo: https://github.com/openvinotoolkit/open_model_zoo
[6] openvino-rs: https://github.com/intel/openvino-rs
[7] openvino-notebooks: https://github.com/openvinotoolkit/openvino_notebooks
[8] wasi-nn crate: https://crates.io/crates/wasi-nn
[9] opencv crate: https://crates.io/crates/opencv
[10] image crate: https://crates.io/crates/image
[11] WebAssembly WASI-NN repo: https://github.com/WebAssembly/wasi-nn