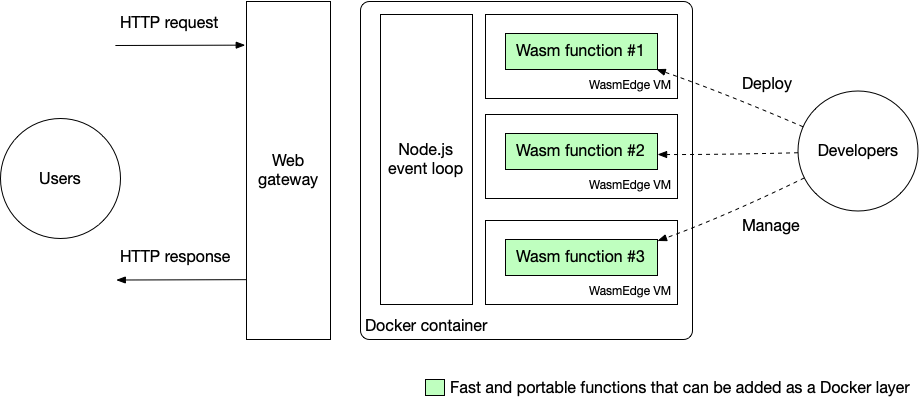
Serverless functions save developers a ton of trouble managing the backend infrastructure. It also simplifies the development process as developers only need to focus on the business logic. This article is a step-by-step guide on how to write and deploy your own WebAssembly serverless functions on AWS Lambda, Amazon's serverless computing platform. In our demo, WebAssembly functions are executed with the WasmEdge runtime. The figure below shows the overall architecture of our solution.
In the first part of this article, we will explain why WebAssembly is a great runtime language for serverless functions. We will compare WebAssembly to high-level programming languages (e.g. Python and JavaScript) as well as machine native executables (Native Client or NaCl). Then, in the second part, we will demonstrate two serverless function examples, both written in Rust and compiled to WebAssembly for deployment. The first example showcases WasmEdge's fast image processing capabilities, whereas the second one runs AI inference powered by WasmEdge's TensorFlow extension.
Why WebAssembly?
The short answer is that WebAssembly is fast, safe and portable.
Why? Here's the long answer.
WebAssembly vs. Python & JavaScript
A recent survey by DataDog found that most AWS Lambda serverless functions are written in JavaScript and Python. That is not surprising as those are the two most popular programming languages in the world today.
However, it is also well known that those high-level languages are very slow. In fact, according to a paper published on Science, up to 60,000 times slower than the same programs written in C or C++.
Hence, while JavaScript and Python are great for simple functions, they are not suitable for computational intensive tasks, such as image, video, audio, and natural language processing, which are increasing common in modern applications.
WebAssembly, on the other hand, achieves performance on par with C/C++ compiled native binaries (NaCl) while still preserving portability, safety, and manageability associated with high level language runtimes. WasmEdge is one of the fastestWebAssembly runtime on the market today.
WebAssembly vs. Native Client
But, what are the advantages of WebAssembly over NaCl when both are running inside a Docker container or microVM?
Our vision for the future is to run WebAssembly as an alternative lightweight runtime side-by-side with Docker and microVMs in cloud native infrastructure. WebAssembly offers much higher performance and consumes much less resources than Docker-like containers or microVMs. But for now, AWS Lambda and many other platforms only supports running WebAssembly inside a microVM. Nonetheless, running WebAssembly functions inside a microVM still offers many advantages over running containerized NaCl programs.
For starters, WebAssembly provides fine-grained runtime isolation for individual functions. A microservice could have multiple functions and support services running inside a microVM. WebAssembly can make the microservice more secure and more stable.
Second, the WebAssembly bytecode is portable. Even inside a container, NaCl is still dependent on the underlying CPU, OS, and dynamic libraries installed on the OS. WebAssembly bytecode applications are platform independent. Developers can write once and deploy in any cloud, any container, and any hardware platform.
Third, WebAssembly apps are easy to deploy and manage. They have much less platform dependencies and complexities compared with NaCl dynamic libraries and executables.
Finally, WebAssembly is polyglot. C/C++, Rust, Swift, Kotlin programs can all be easily compiled into WebAssembly. Even JavaScript is supported on WebAssembly. The WasmEdge Tensorflow API provides the most ergonomic way to execute Tensorflow models in the Rust programming language.
As we can see, WebAssembly + WasmEdge is a much better alternative. To actually witness this result, let's jump into the examples and get our hands dirty.
Prerequisites
Since our demo WebAssembly functions are written in Rust, you will need a Rust compiler. Make sure that you install the wasm32-wasi compiler target as follows, in order to generate WebAssembly bytecode.
$ rustup target add wasm32-wasi
The demo application front end is written in Next.js, and deployed on AWS Lambda. We will assume that you already have the basic knowledge of how to work with Next.js and Lambda.
Example 1: Image processing
Our first demo application allows users to upload an image and then invoke a serverless function to turn it into black and white. A live demo deployed through GitHub Pages is available.
Fork the demo application’s GitHub repo to get started. To deploy the application on AWS Lambda, follow the guide in the repository README.
Create the function
This repo is a standard Next.js application. The backend serverless function is in the api/functions/image_grayscale folder. The src/main.rs file contains the Rust program’s source code. The Rust program reads image data from the STDIN, and then outputs the black-white image to the STDOUT.
use hex;
use std::io::{self, Read};
use image::{ImageOutputFormat, ImageFormat};

fn main() {
  let mut buf = Vec::new();
  io::stdin().read_to_end(&mut buf).unwrap();

  let image_format_detected: ImageFormat = image::guess_format(&buf).unwrap();
  let img = image::load_from_memory(&buf).unwrap();
  let filtered = img.grayscale();
  let mut buf = vec![];
  match image_format_detected {
    ImageFormat::Gif => {
        filtered.write_to(&mut buf, ImageOutputFormat::Gif).unwrap();
    },
    _ => {
        filtered.write_to(&mut buf, ImageOutputFormat::Png).unwrap();
    },
  };
  io::stdout().write_all(&buf).unwrap();
  io::stdout().flush().unwrap();
}
You can use Rust’s cargo tool to build the Rust program into WebAssembly bytecode or native code.
$ cd api/functions/image-grayscale/
$ cargo build --release --target wasm32-wasi
Copy the build artifacts to the api folder.
$ cp target/wasm32-wasi/release/grayscale.wasm ../../
When we build the docker image,
api/pre.shis executed.pre.shinstalls the WasmEdge runtime, and then compiles each WebAssembly bytecode program into a nativesolibrary for faster execution.
Create the service script to load the function
The api/hello.js script loads the WasmEdge runtime, starts the compiled WebAssembly program in WasmEdge, and passes the uploaded image data via STDIN. Notice that api/hello.js runs the compiled grayscale.so file generated by api/pre.sh for better performance.
const { spawn } = require('child_process');
const path = require('path');

function _runWasm(reqBody) {
  return new Promise(resolve => {
    const wasmedge = spawn(path.join(__dirname, 'wasmedge'), [path.join(__dirname, 'grayscale.so')]);

    let d = [];
    wasmedge.stdout.on('data', (data) => {
      d.push(data);
    });

    wasmedge.on('close', (code) => {
      let buf = Buffer.concat(d);
      resolve(buf);
    });

    wasmedge.stdin.write(reqBody);
    wasmedge.stdin.end('');
  });
}
The exports.handler part of hello.js exports an async function handler, used to handle different events every time the serverless function is called. In this example, we simply process the image by calling the function above and return the result, but more complicated event-handling behavior may be defined based on your need. We also need to return some Access-Control-Allow headers to avoid Cross-Origin Resource Sharing (CORS) errors when calling the serverless function from a browser. You can read more about CORS errors here if you encounter them when replicating our example.
exports.handler = async function(event, context) {
  var typedArray = new Uint8Array(event.body.match(/[\da-f]{2}/gi).map(function (h) {
    return parseInt(h, 16);
  }));
  let buf = await _runWasm(typedArray);
  return {
    statusCode: 200,
    headers: {
      "Access-Control-Allow-Headers" : "Content-Type,X-Amz-Date,Authorization,X-Api-Key,X-Amz-Security-Token",
      "Access-Control-Allow-Origin": "*",
      "Access-Control-Allow-Methods": "DELETE, GET, HEAD, OPTIONS, PATCH, POST, PUT"
    },
    body: buf.toString('hex')
  };
}
Build the Docker image for Lambda deployment
Now we have the WebAssembly bytecode function and the script to load and connect to the web request. In order to deploy them as a function service on AWS Lambda, you still need to package the whole thing into a Docker image.
We are not going to cover in detail about how to build the Docker image and deploy on AWS Lambda, as there are detailed steps in the Deploy section of the repository README. However, we will highlight some lines in the Dockerfile for you to avoid some pitfalls.
FROM public.ecr.aws/lambda/nodejs:14

# Change directory to /var/task
WORKDIR /var/task

RUN yum update -y && yum install -y curl tar gzip

# Bundle and pre-compile the wasm files
COPY *.wasm ./
COPY pre.sh ./
RUN chmod +x pre.sh
RUN ./pre.sh

# Bundle the JS files
COPY *.js ./

CMD [ "hello.handler" ]
First, we are building the image from AWS Lambda's Node.js base image. The advantage of using AWS Lambda's base image is that it includes the Lambda Runtime Interface Client (RIC), which we need to implement in our Docker image as it is required by AWS Lambda. The Amazon Linux uses yum as the package manager.
These base images contain the Amazon Linux Base operating system, the runtime for a given language, dependencies and the Lambda Runtime Interface Client (RIC), which implements the Lambda Runtime API. The Lambda Runtime Interface Client allows your runtime to receive requests from and send requests to the Lambda service.
Second, we need to put our function and all its dependencies in the /var/task directory. Files in other folders will not be executed by AWS Lambda.
Third, we need to define the default command when we start our container. CMD [ "hello.handler" ] means that we will call the handler function in hello.js whenever our serverless function is called. Recall that we have defined and exported the handler function in the previous steps through exports.handler = ... in hello.js.
Optional: test the Docker image locally
Docker images built from AWS Lambda's base images can be tested locally following this guide. Local testing requires AWS Lambda Runtime Interface Emulator (RIE), which is already installed in all of AWS Lambda's base images. To test your image, first, start the Docker container by running:
docker run -p 9000:8080 myfunction:latest
This command sets a function endpoint on your local machine at http://localhost:9000/2015-03-31/functions/function/invocations.
Then, from a separate terminal windown, run:
curl -XPOST "http://localhost:9000/2015-03-31/functions/function/invocations" -d '{}'
And you should get your expected output in the terminal.
If you don't want to use a base image from AWS Lambda, you can also use your own base image and install RIC and/or RIE while building your Docker image. Just follow Create an image from an alternative base image section from this guide.
That's it! After building your Docker image, you can depoly it to AWS Lambda following steps outlined in the repository README. Now your serverless function is ready to rock!
Example 2: AI inference
The second demo application allows users to upload an image and then invoke a serverless function to classify the main subject on the image.
It is in the same GitHub repo as the previous example but in the tensorflow branch. The backend serverless function for image classification is in the api/functions/image-classification folder in the tensorflow branch. The src/main.rs file contains the Rust program’s source code. The Rust program reads image data from the STDIN, and then outputs the text output to the STDOUT. It utilizes the WasmEdge Tensorflow API to run the AI inference.
pub fn main() {
    // Step 1: Load the TFLite model
    let model_data: &[u8] = include_bytes!("models/mobilenet_v1_1.0_224/mobilenet_v1_1.0_224_quant.tflite");
    let labels = include_str!("models/mobilenet_v1_1.0_224/labels_mobilenet_quant_v1_224.txt");

    // Step 2: Read image from STDIN
    let mut buf = Vec::new();
    io::stdin().read_to_end(&mut buf).unwrap();

    // Step 3: Resize the input image for the tensorflow model
    let flat_img = wasmedge_tensorflow_interface::load_jpg_image_to_rgb8(&buf, 224, 224);

    // Step 4: AI inference
    let mut session = wasmedge_tensorflow_interface::Session::new(&model_data, wasmedge_tensorflow_interface::ModelType::TensorFlowLite);
    session.add_input("input", &flat_img, &[1, 224, 224, 3])
           .run();
    let res_vec: Vec<u8> = session.get_output("MobilenetV1/Predictions/Reshape_1");

    // Step 5: Find the food label that responds to the highest probability in res_vec
    // ... ...
    let mut label_lines = labels.lines();
    for _i in 0..max_index {
      label_lines.next();
    }

    // Step 6: Generate the output text
    let class_name = label_lines.next().unwrap().to_string();
    if max_value > 50 {
      println!("It {} a <a href='https://www.google.com/search?q={}'>{}</a> in the picture", confidence.to_string(), class_name, class_name);
    } else {
      println!("It does not appears to be any food item in the picture.");
    }
}
You can use the cargo tool to build the Rust program into WebAssembly bytecode or native code.
$ cd api/functions/image-classification/
$ cargo build --release --target wasm32-wasi
Copy the build artifacts to the api folder.
$ cp target/wasm32-wasi/release/classify.wasm ../../
Again, the api/pre.sh script installs WasmEdge runtime and its Tensorflow dependencies in this application. It also compiles the classify.wasm bytecode program to the classify.so native shared library at the time of deployment.
The api/hello.js script loads the WasmEdge runtime, starts the compiled WebAssembly program in WasmEdge, and passes the uploaded image data via STDIN. Notice api/hello.js runs the compiled classify.so file generated by api/pre.sh for better performance. The handler function is similar to our previous example, and is omitted here.
const { spawn } = require('child_process');
const path = require('path');

function _runWasm(reqBody) {
  return new Promise(resolve => {
    const wasmedge = spawn(
      path.join(__dirname, 'wasmedge-tensorflow-lite'),
      [path.join(__dirname, 'classify.so')],
      {env: {'LD_LIBRARY_PATH': __dirname}}
    );

    let d = [];
    wasmedge.stdout.on('data', (data) => {
      d.push(data);
    });

    wasmedge.on('close', (code) => {
      resolve(d.join(''));
    });

    wasmedge.stdin.write(reqBody);
    wasmedge.stdin.end('');
  });
}

exports.handler = ... // _runWasm(reqBody) is called in the handler
You can build your Docker image and deploy the function in the same way as outlined in the previous example. Now you have created a web app for subject classification!
What's next
Running WasmEdge from Docker containers deployed on AWS Lambda is an easy way to add high-performance functions to web applications. Going forward an even better approach is to use WasmEdge as the container itself. There will be no Docker and no Node.js to bootstrap WasmEdge. This way, we can reach much higher efficiency for running serverless functions. WasmEdge is already compatible with Docker tools. If you are interested in joining WasmEdge and CNCF for this exciting work, let us know!